This article is part of a series: From Excel to SSIS
- Getting started
- File Save As (a kind of Hello, World! program for SSIS)
- Filtering rows
- Gouping and calculating
- Joining streams of data
0. Introduction
In the previous post I introduced SSIS and how to install it. In this post I will take you through an SSIS equivalent of Hello, World! It will be a very simple program, that will nonetheless achieve 4 things:
- Get you used to using the SSIS tools to create and run a task;
- Introduce you to some SSIS concepts;
- Give you the satisfaction of running an SSIS task;
- Show you how to use files for input and output in SSIS.
In later posts I will skip all the details in this post as I will assume you’re OK with all this, and will concentrate on the new stuff.
1. Create an empty SSIS project
- In Visual Studio, click on File > New > Project…
- In the tree-view of project types in the left-hand pane of the screen, select Installed > Business Intelligence > Integration Services.
- From the middle pane, choose Integration Services Project.
- Then choose a location and file name that you want for the project:

Once you have closed any windows about getting started, I hope you will see something like this:

From left to right, the main elements of the screen below the menu bar are
- SSIS Toolbox: the ingredients you can use to create your SSIS program
- Package.dtsx (Design): you will create your SSIS program by dragging things from the toolbox onto this canvas. The title is Package.dtsx because this is the name of the file you’re editing (see the Solution Explorer), and you’re designing it rather than running it.
- Connection Managers: where you will create things to connect your SSIS program to external sources or destinations of data, such as databases and files.
- Solution Explorer: the files that make up your SSIS program. The .dtsx files are the main parts, and are XML representations of what you see on the canvas and of the connection managers.
2. Create a CSV file using Excel
It doesn’t really matter what’s in here because, unlike in all the later posts, we won’t be be doing anything to change the contents. I have created a file called Alter_egos.csv that looks like this:

3. Get ready to read the CSV file
Right click on the Connection Managers part of the screen and select New Flat File Connection.
On the next screen, give your connection manager a suitable name and then browse to your input file:

It will default to useful values, for instance assuming that the fields are delimited, the first row has column names, no rows should be skipped etc. If you pick Columns from the left you will see that it has been able to make sense of your file:
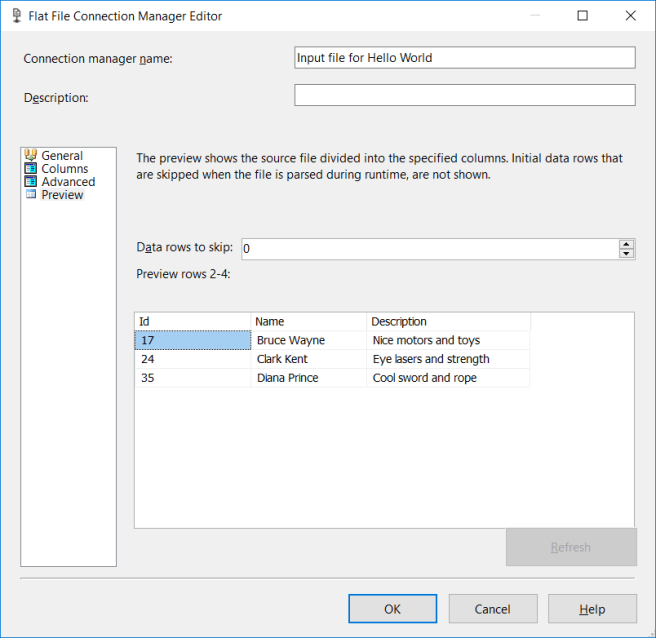
Click OK to finish creating the connection manager, and you will see it appear in the Connection Managers section at the bottom of the screen.
SSIS now knows about the input file – where it is and its structure (meta data about the columns). The meta data is important and useful information, and you will see shortly how it flows through your program at design time to enable the data to flow through your program when it runs.
4. Tell SSIS to read the file
So far we have a connection manager for the input file, but we’re not using it. The next step will seem like more bother than its worth, but that’s because this is such a small and simple example.
The canvas has several tabs – Control Flow, Data Flow etc. The Control Flow tab edits the top-level structure of a single .dtsx file. The Data Flow tab is to edit an optional lower level of structure that you can use for some, none or all of your program’s processing.
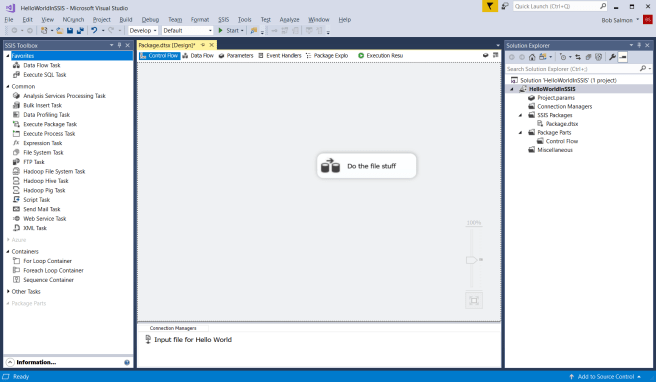
Drag a Data Flow Task from the toolbox on the left onto the Control Flow. Right click on it, select Rename and give it a new name:
Double-click on this, which will let you edit the Data Flow Task in the Data Flow editor. You will see that the highlight above the canvas moves from Control Flow to Data Flow, and it shows you that the particular Data Flow Task you’re editing is the one you’ve just created. Also notice a new set of things has appeared in the toolbox on the left.
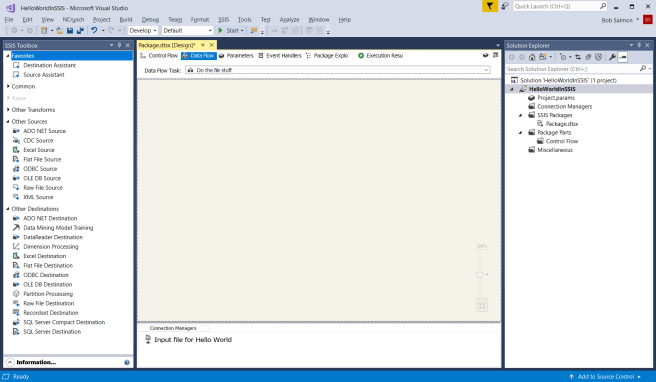
We only have one more thing to do before we will actually be reading the input file. Drag a Flat File Source from Other Sources in the toolbox on the left, onto the canvas:

Notice that it has a red blob on it, and two arrows underneath – a blue one and a red one. The red blob shows that there is a problem with this element (which we will fix very soon by configuring it). The blue arrow is where data will flow from the input file on to the next thing in our program, which in our case will be the thing that writes the data to a new file. The red arrow is where data that’s in error in some way will flow (in our case there will be none).
Double-click on the Flat File Source so that we can configure it and remove the error.
Pick the connection manager we have already created as the one to use for this element, and then click OK. The error should now have gone, and we have finally told SSIS how to read from the input file.
A Data Flow Task is unusual in that it brings in another level of structure, with its own tab in the editor and set of options in the toolbox. Most tasks in the control flow toolbox will be different to this – they will have properties that you can configure by double-clicking or right-clicking, but you will stay in the control flow tab of the editor.
The need for both control flow and data flow isn’t obvious yet because all we’re doing in the control flow is saying we want to do data flow stuff. However for more complex tasks, involving more complex logic around what to do next and batching work up into database transactions, a single Data Flow Task isn’t enough and you will have to string it together in the control flow with other things like loops and possibly other Data Flow Tasks.
5. Write a new CSV file
We would normally do some processing of the data between reading it and writing it, but in this example we are simply reading then immediately writing to another file. So instead of the normal ETL of Extract, Transform, Load we are doing just the E and L parts.
We will create the output in a slightly different way to the input, just to show you an alternative way. Instead of creating a connection manager and then picking it when configuring the element that should use it, we will create it while we configure the element that will use it.
From Other Destinations in the toolbox, drag Flat File Destination onto the canvas. This will have a red blob underneath because it hasn’t been properly configured yet, but notice it doesn’t have any arrows underneath as a destination is the end of the line for the data.
Click on the source element to make the arrows underneath it visible again, and then drag the blue one onto the destination element. Then double click on the destination so we can configure it.
Instead of picking a connection manager from the list, click on New to create a new one.
Make sure the format of the file is Delimited and then click OK.
Give it a name and then browse to where you want the output file to be:

Click on OK and you can click on Mappings on the left of the next screen to see how the input data has defaulted to simply passing through to the output data. The mapping can get more complicated than that, but this is just what we need for now.
This automatic wiring up of the mapping is via meta data flowing through the design, as I mentioned earlier. If you create your program in the order that data flows through it, i.e. source first and destination last, then it is more likely that the meta data will be able to flow through the design in ways that will make your life simpler and easier.
Type in a comma-separated list of column headings for the Header that matches what you had in the input file.
Click OK again and you will see your program ready to go, with no errors, and two connection managers at the bottom of the screen:

6. Run
To run the program, click on the green Start button above the canvas. It will crunch for a bit, the blue bar at the bottom of the screen will turn orange in the normal Visual Studio way when it runs something, and hopefully you will see something like this:

The green ticks show that every element has run successfully. Notice that three rows of data have gone from the reading element to the writing element, because it didn’t bother with the header row. In a more complex program you will probably have more interesting labels showing row counts. For instance, an element might split data based on day of the week, and there would be 7 outputs each with a fraction of the inputs. Or you might have rows that cause errors, so there would be a fraction of the inputs flowing down an error output path.
7. Look at the output
If you open the output directory you should see the output file, and its contents should match the input file.
This really is a Hello, World! kind of SSIS task. Each row of the input file has been passed through to an output file unchanged. If you’re just trying to produce a copy of a file, this is overkill! Each row of the input has been read, split into its fields, then passed on to something that will assemble the fields into a line and write the line to an output file.
Normally we would take advantage of having all the detail of rows and columns to do interesting and useful things, like logic to test if a value matches some filter, or do some calculation, or join the row with a row from another source of data.
8. Conclusion
You have successfully recreated File > Save As in Excel, the rather hard way, in SSIS. However, the point isn’t to show how SSIS can do Excel things, it’s to get you started with SSIS. With this under your belt, we can move onto doing something to the data before we write it out again.
